Table of Contents
1. Download Software
– Oracle VM VirtualBox Download page
– Oracle Linux Download page
2. VirtualBox Network Setup
3. Virtual Machine Setup
4. Oracle Linux 7.2 (OEL7) Installation
5. Guest Additions
6. VirtualBox Network Testing
– Network Address Translation (NAT)
– Bridged Adapter
– Host-only Adapter
7. Creating Shared Folder for your VirtualBox
8. Add Disk Storage to Oracle VM VirtualBox
– Adds new Hard Disk
– Partition the Device
– Format the Partition
– Mount the Partition
– Automate mounting on startup
1. Download Software
Download the following software.
There might be some slight variation on how the screen shots look depending on your Oracle Linux and VirtualBox version.
– Oracle Linux 7 (Latest version as of October 2016 is 7.2)
– Oracle VM VirtualBox (Latest version as of October 2016 is 5.1.8)
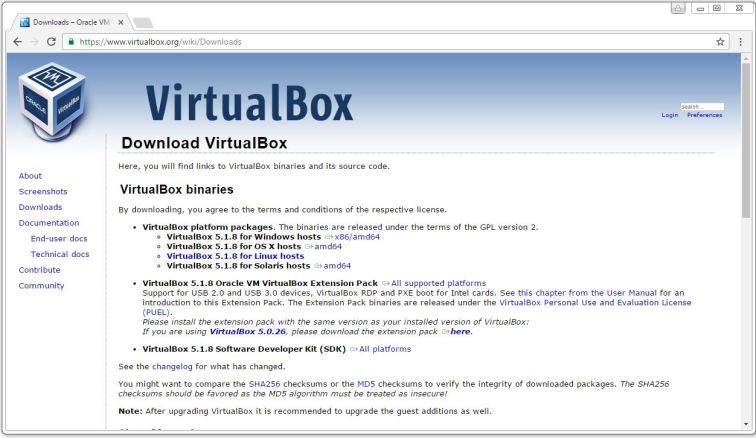
Oracle VM VirtualBox Download page
Latest version as of October 2016 is 5.1.8 but we will be using 5.0.10 on our example.
VirtualBox-5.1.8-111374-Win.exe
https://www.virtualbox.org/wiki/Downloads
Oracle Linux Download page
http://www.oracle.com/technetwork/server-storage/linux/downloads/index.html
Documentation, additional downloads, related solutions and features can be found here.
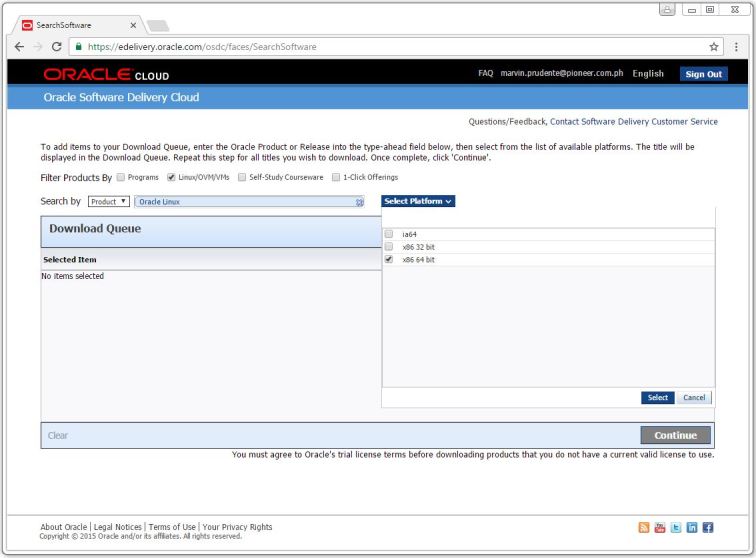
Installation media (ISO images) for Oracle Linux (and Oracle VM) are freely available from the Oracle Software Delivery Cloud (edelivery).
Login on edelivery:
https://edelivery.oracle.com/osdc/faces/Home.jspx
You must have an account (OTN login), if you do not have it, you can create a new one, it’s free.
– Check the Linux/OVM/VMs checkbox
– Select Oracle Linux in the Product field
– Select the Platform, I’m using Windows 10 64bit, so I have selected x86 64 bit.
– Click the Continue button.
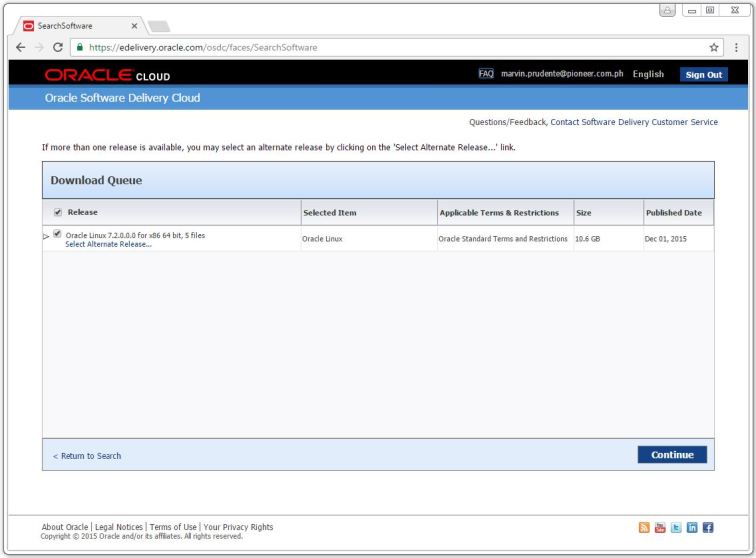
Select Oracle Linux 7.2 release then click the Continue button.
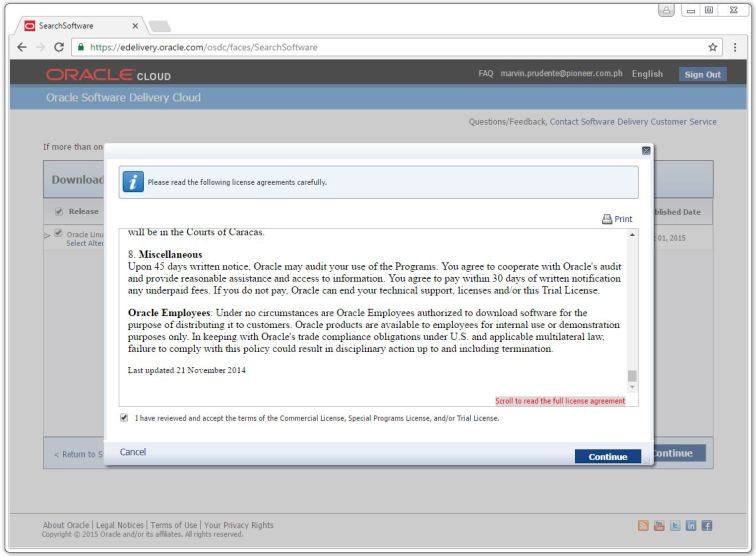
Review and accept the License Agreement then click the Continue button.
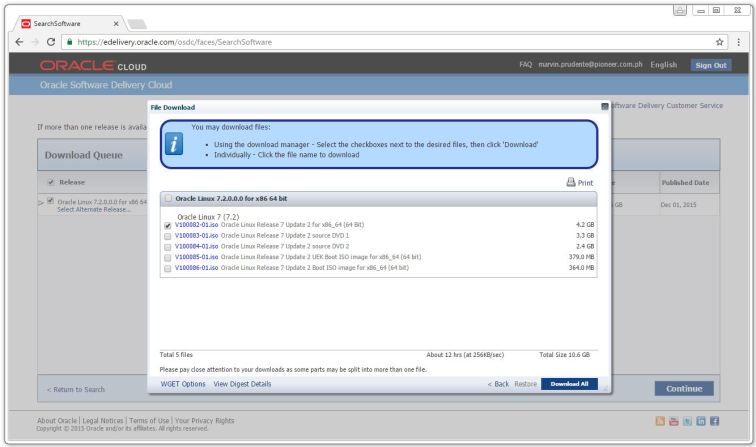
You can now download the Oracle 7.2 ISO files (10.6 GB) but on our example, we’ll just download the main file V100082-01.iso Oracle Linux Release 7 Update 2 for x86_64 (64 Bit) 4.2 GB
2. VirtualBox Network Setup
VirtualBox Installation Details:
https://www.virtualbox.org/manual/ch02.html
We will test NAT, Bridged and Host-only Adapter network on our example.
We need to make sure a host-only network is configured and IP Address range for that network is set.
– Start Oracle VM VirtualBox
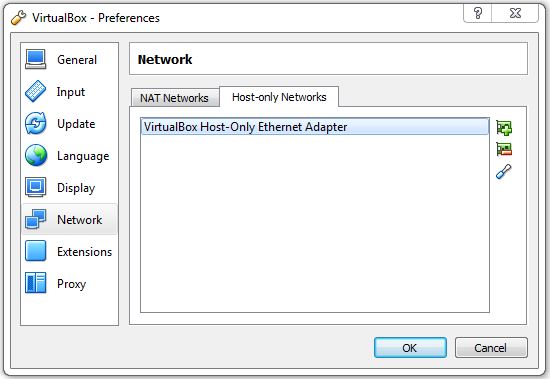
– Select “File” menu > “Preferences…” (CTRL+G)
– Click “Network” in the left pane and click the “Host-only Networks” tab.
– Click the “Add new host-only network” button on the right size of the screen. Depending on the host OS, a network called “VirtualBox Host-Only Ethernet Adapter” or “vboxnet0” will be created. If it already exists, you can check the content by clicking the “Edit selected host-only network”
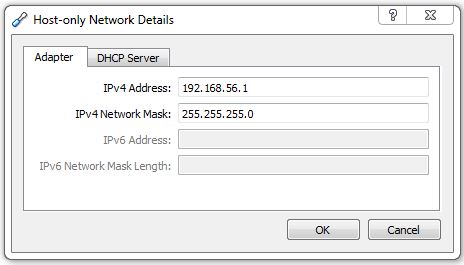
If you want to use a different subnet for your public addresses you can change the network details here. Just make sure the subnet you choose doesn’t match any real subnets on your network. On our example we will use the default 192.168.56.X
3. Virtual Machine Setup
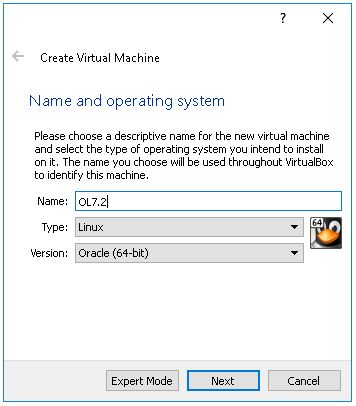
Start Oracle VM VirtualBox and click the “New” button on the toolbar. Enter the name “OL7.2”, Type/OS “Linux” and Version “Oracle (64 bit)”, then click the “Next” button.
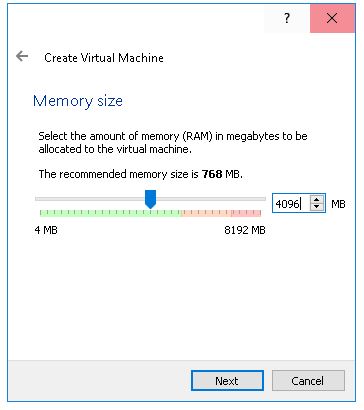
Enter “4096” for the amount of memory (RAM) then click the “Next” button.
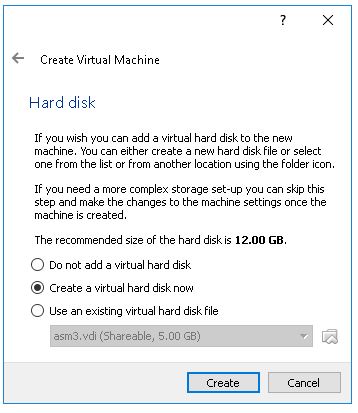
Accept the default option to create a new virtual hard disk by clicking the “Create” button.
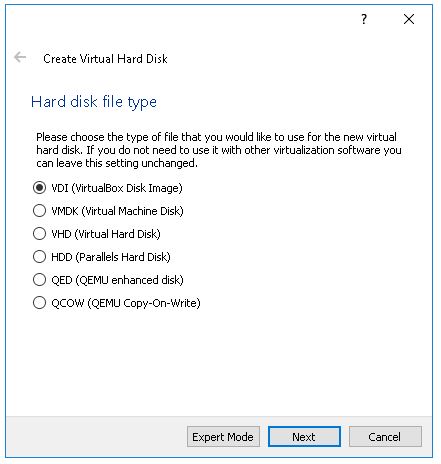
Accept the default hard drive file type by clicking the “Next” button.
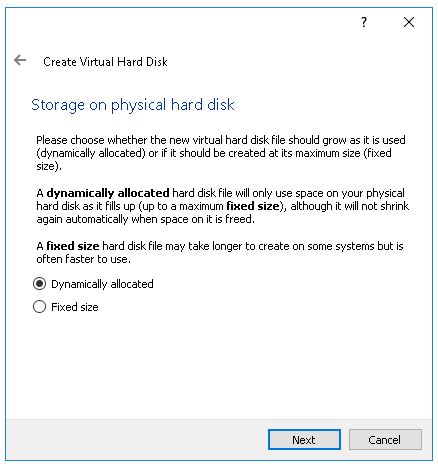
Accept the “Dynamically allocated” option by clicking the “Next” button.
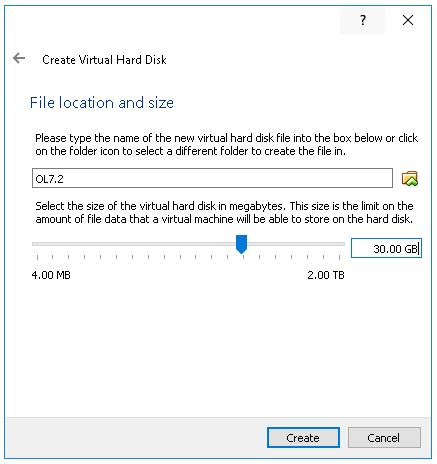
Set the size to “30.00 GB” then click the “Create” button.
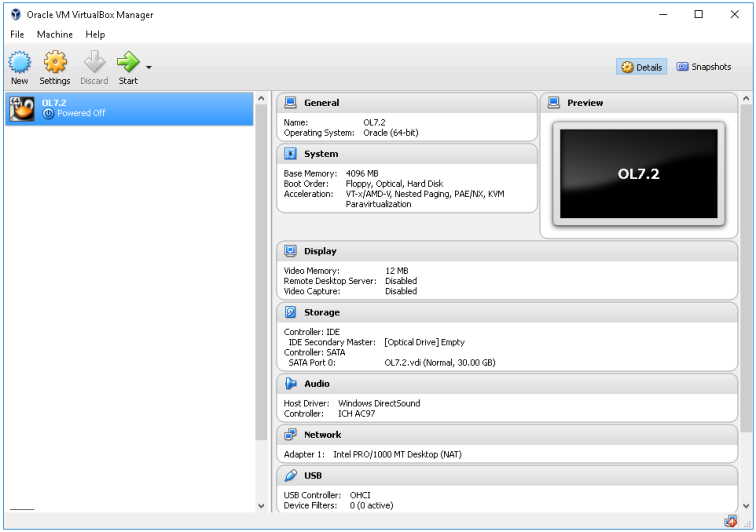
The “OL7.2” VM will appear on the left hand pane. Select it then click the “Settings” button on the toolbar.
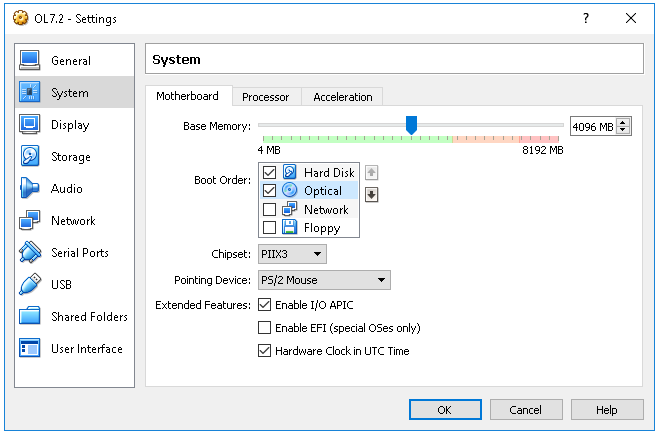
Click “System” in the left pane. Move “Hard Disk” to the top of the boot order and uncheck the “Floppy” option, then click the “OK” button.
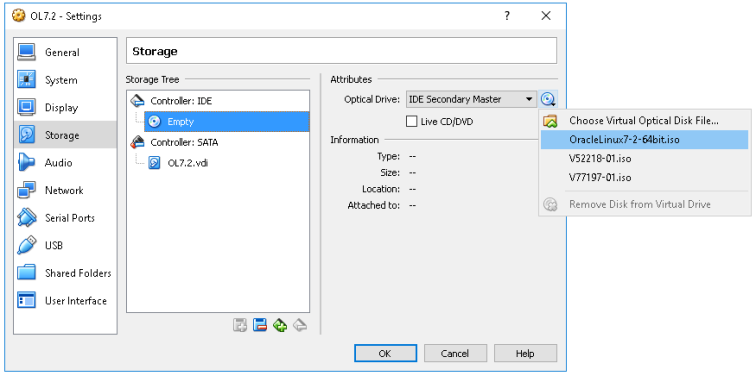
Click “Storage” in the left pane. Click on the Optical Drive and select the Oracle Linux 7.2 ISO that we downloaded earlier then click the “OK” button.
With the new VM highlighted, click the “Start” button on the toolbar (Normal Start).

4. Oracle Linux 7.2 (OEL7) Installation
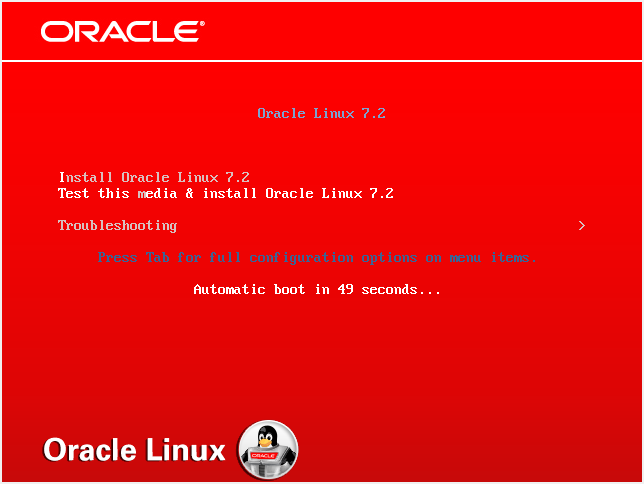
4.1. Boot from DVD or ISO file. Select the first option “Install Oracle Linux 7.2” and press “enter” key.
4.2. Select your language and then click “Continue” button.

4.3. You will see the “INSTALLATION SUMMARY” screen. You must complete any marked items before you can continue with the installation. Depending on your requirements, you may also want to alter the default settings by clicking on the relevant links.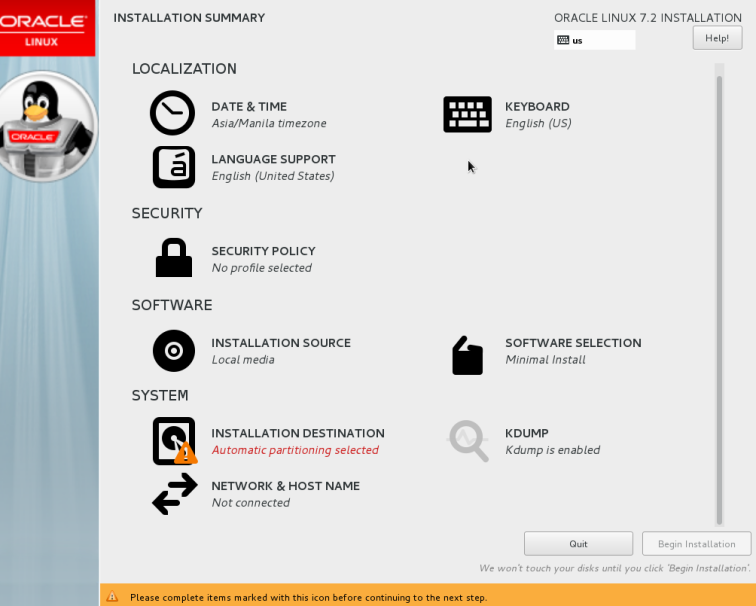
4.4. If you want GUI console, click the “SOFTWARE SELECTION” link and pick the following options:
Base Environment > Server with GUI
Add-Ons for Selected Environment > Compatibility Libraries
Add-Ons for Selected Environment > Development Tools
Once you have completed your selections, click the “Done” button.

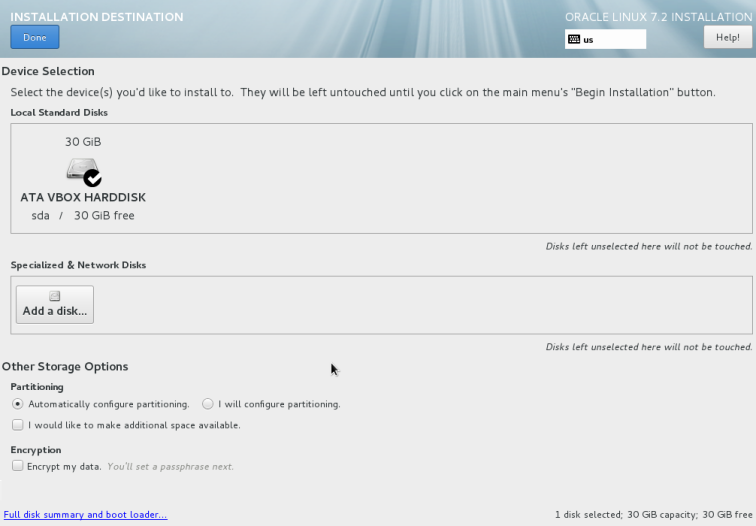
4.5. Click on the “INSTALLATION DESTINATION” link. Select your disk to install Oracle. You can change partitioning here. If you are happy to use automatic partitioning of the whole disk, click the “Done” button to return to the previous screen.
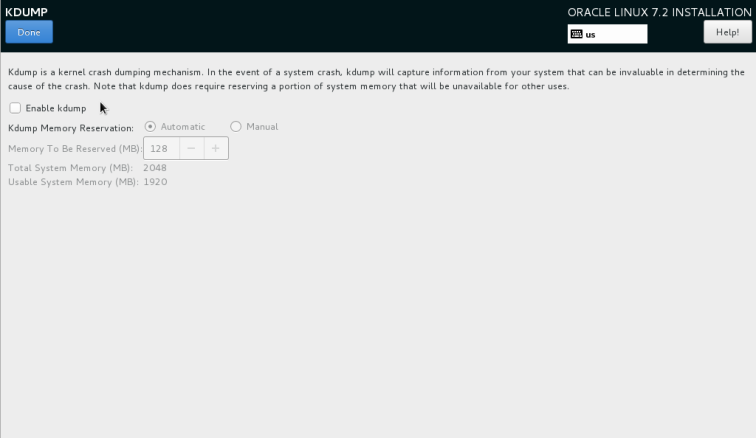
4.6. Click on the “KDUMP” link. Uncheck the “Enable kdump” checkbox then click the “Done” button to return to the previous screen.
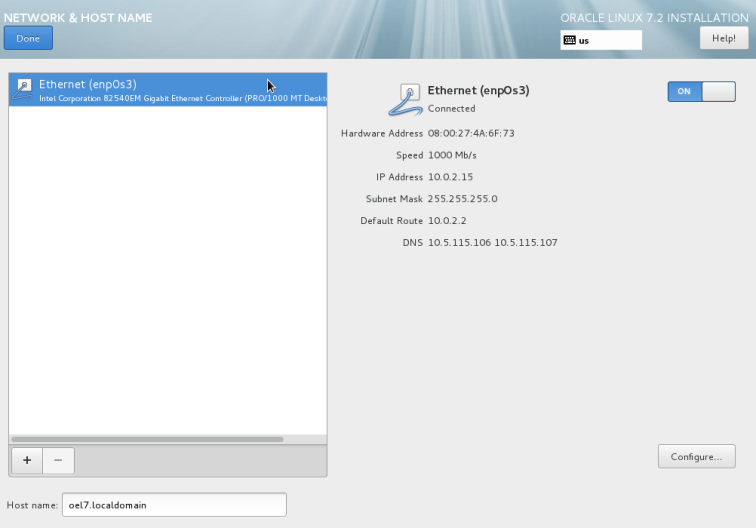
4.7. Click “NETWORK & HOSTNAME” link to setup the network. Enter your Hostname (in my case oel7.localdomain). Set “ON” switch for Ethernet card/s then click “Configure…” button to set the network card details.
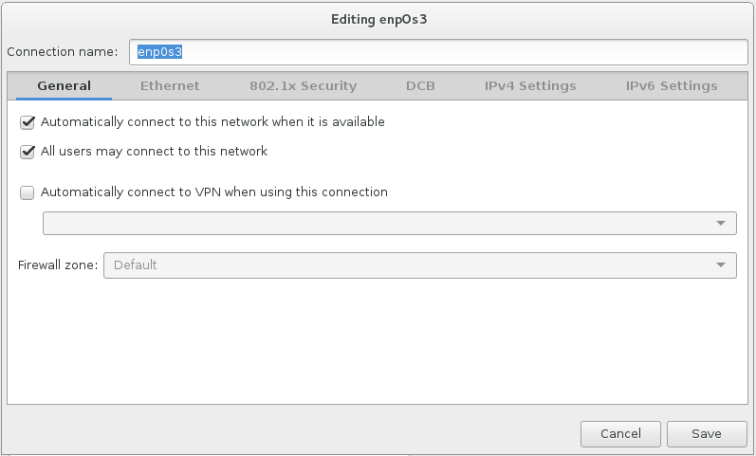
4.8. In the General tab, check the “Automatically connect to this network when it is available” checkbox to activate it automatically after reboot.
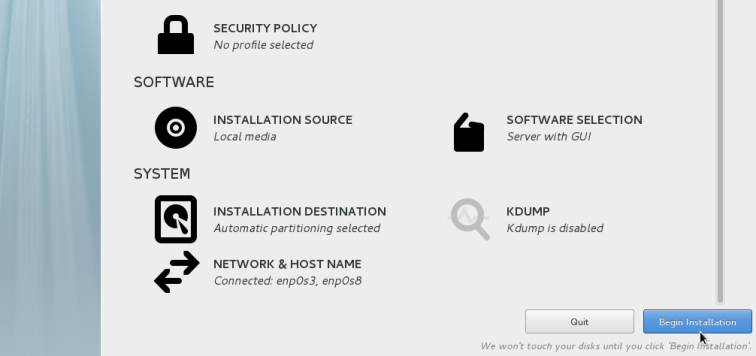
4.9. Once you have completed your alterations to the default configuration, click the “Begin Installation” button.
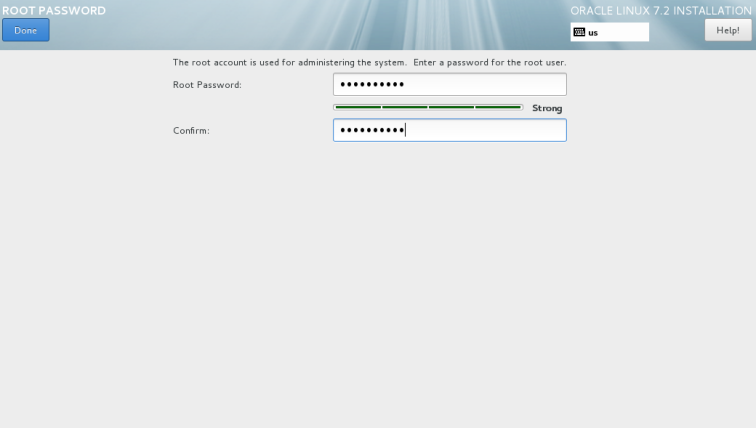
4.10. Click the “Root Password” link.
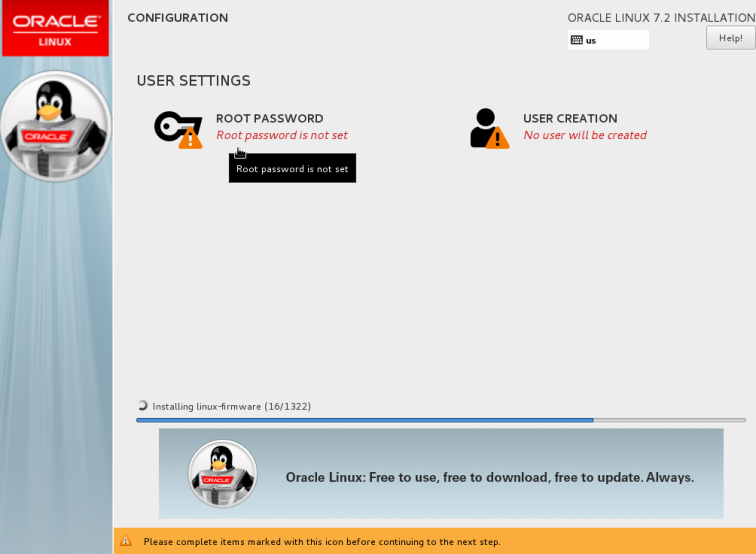
4.11. Enter the root password and click the “Done” button.
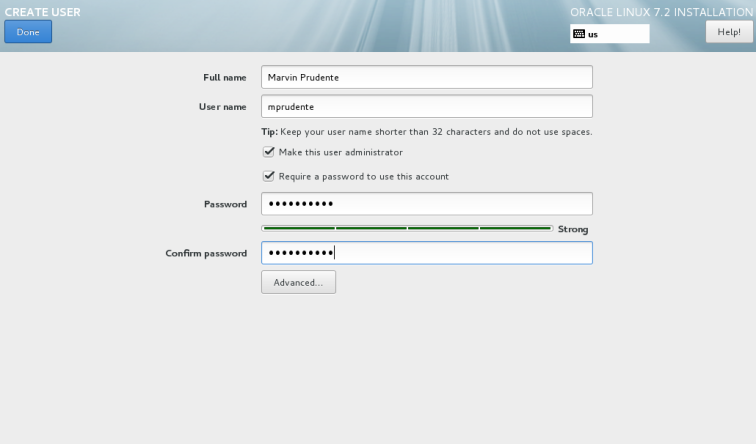
4.12. Click the “User Creation” link. Enter the user details and select the “Make this user administrator” option, then click the “Done” button.
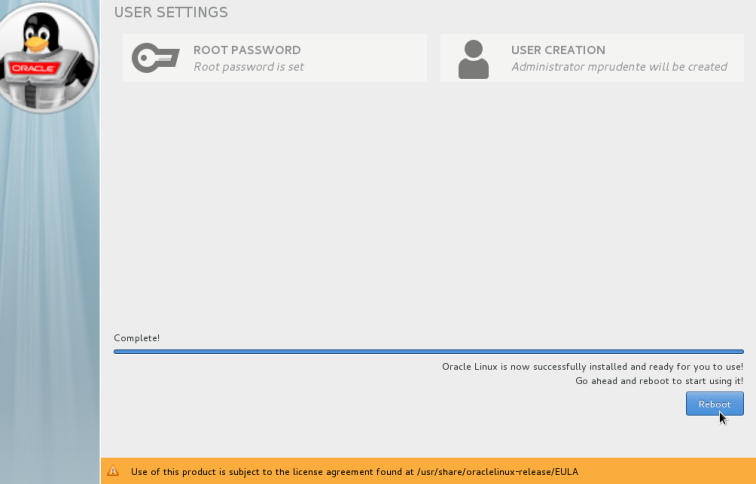
4.13. When installation is completed, click the “Reboot” button.
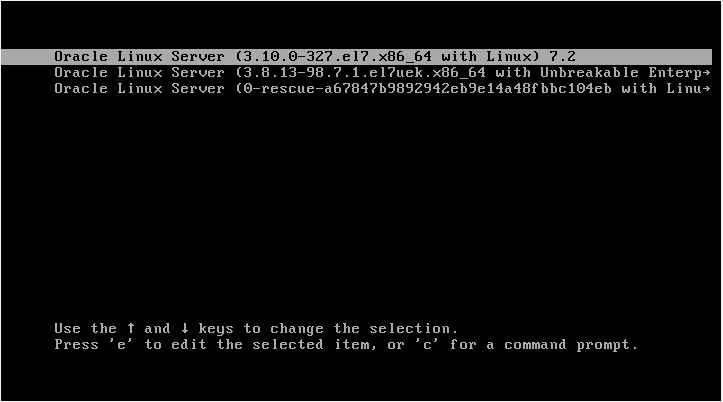
4.14. After the reboot, select the first option
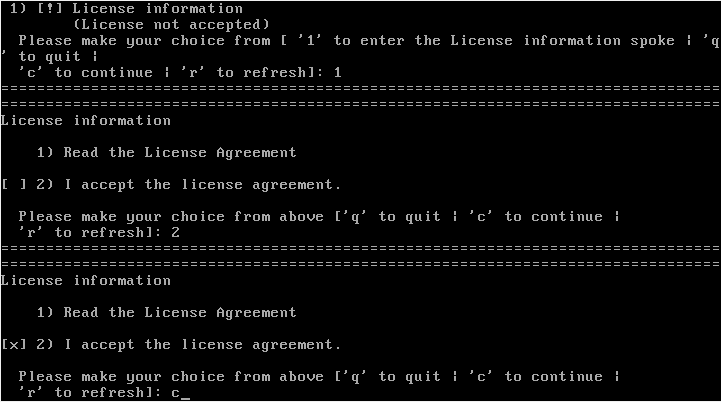
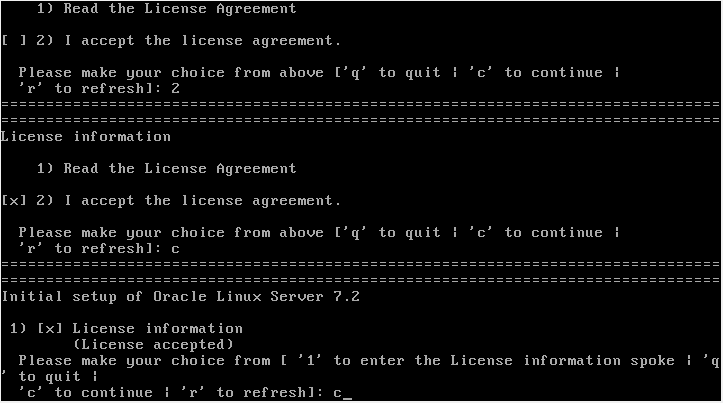
4.15. Accept the “License agreement”
1 – To enter the License information
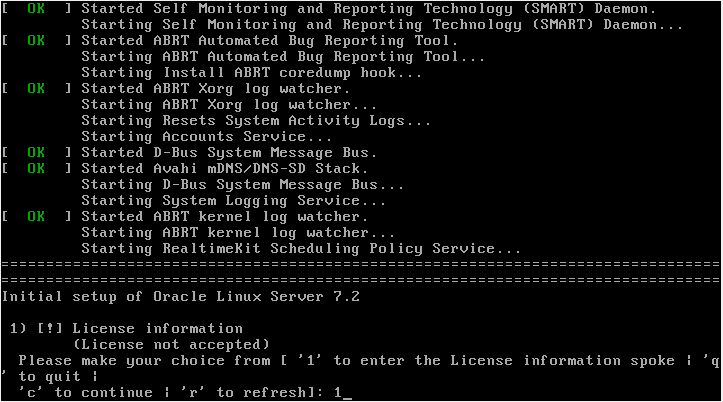
2 – I accept the license agreement
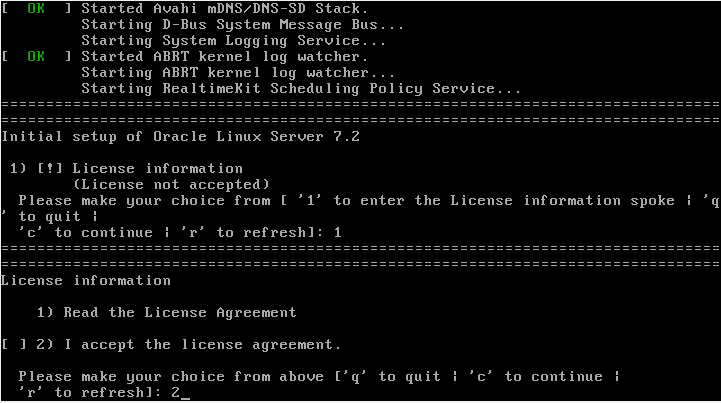
c – To continue
c – To continue
4.16. On the login screen click on the user you want to log in as (in my case Marvin Prudente). Enter the password and click the “Sign In” button.

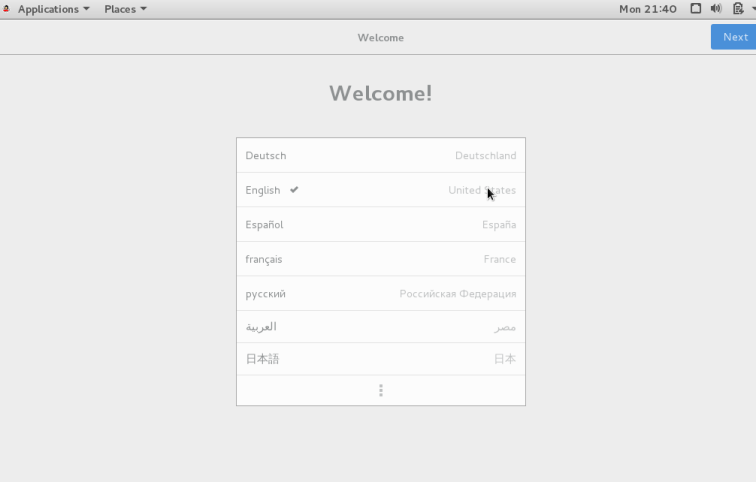
Choose your language preferences and click the “Next” button.
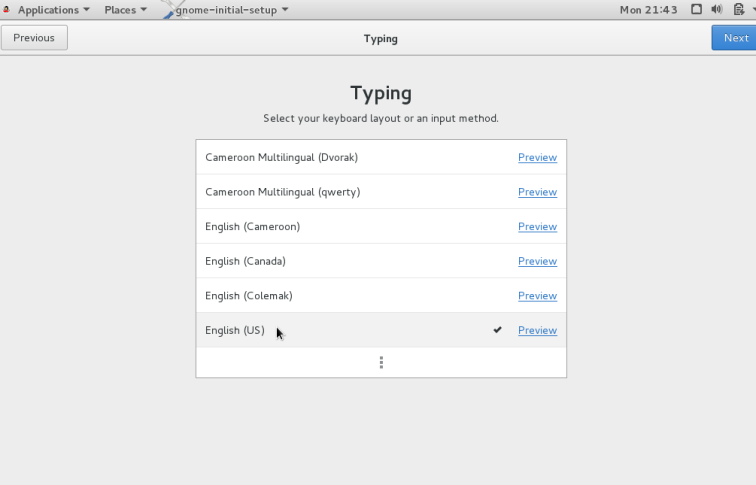
Select your keyboard preferences and click the “Next” button.
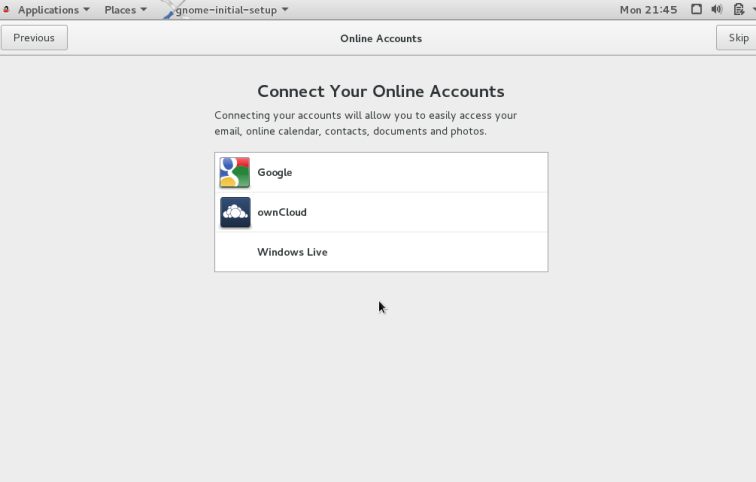
Connect to your existing online accounts or just click the “Skip” button.
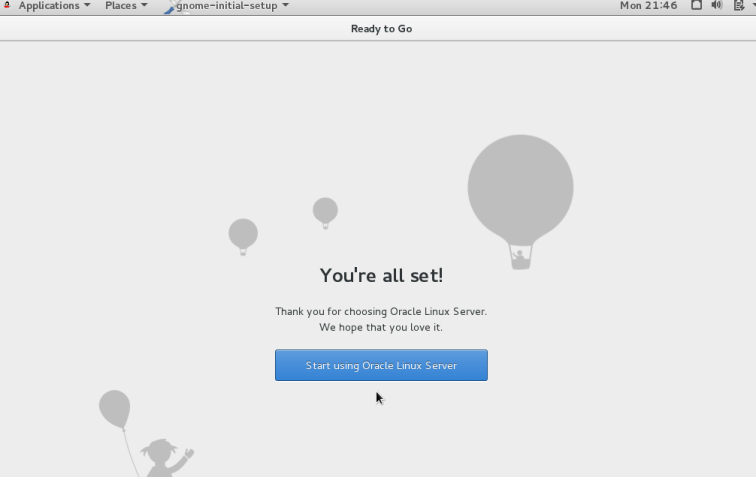
Click the “Start using Oracle Linux Server” button.
You should see introduction videos about Gnome 3 and Gnome help.
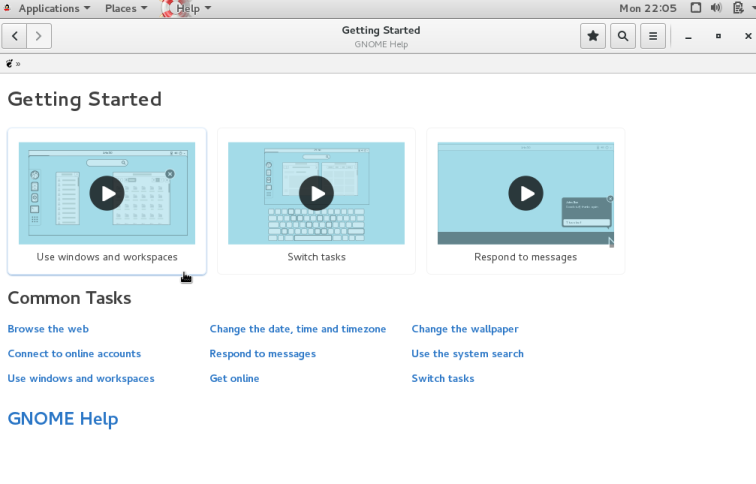
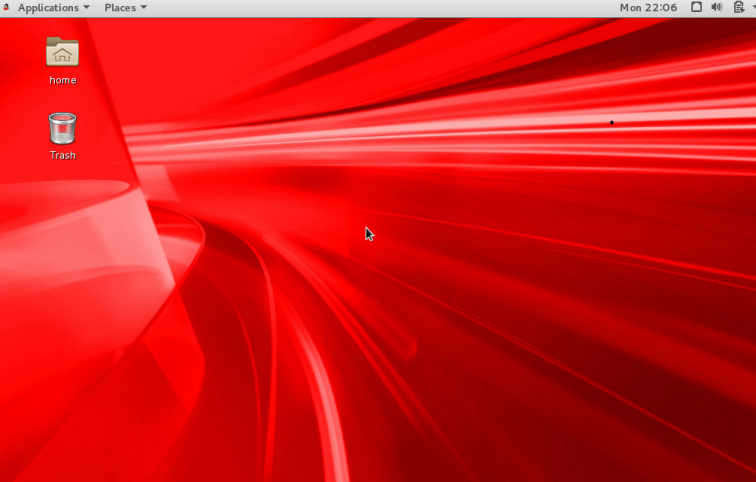
You are now presented with the console screen.
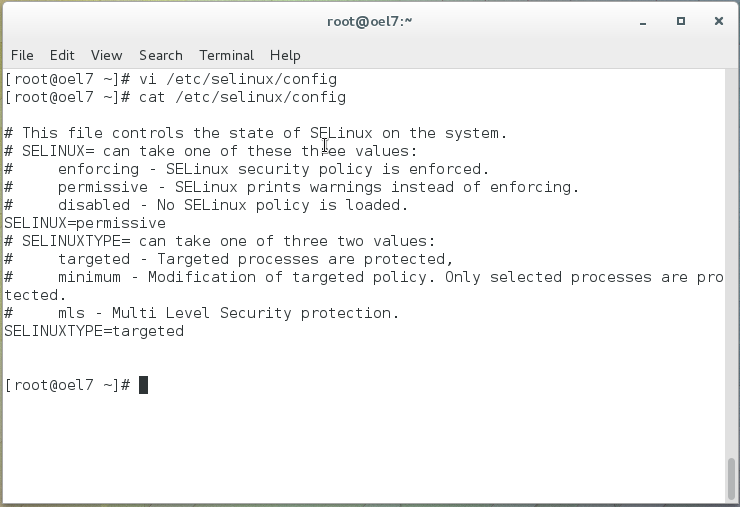
SELinux
SELinux is an access control implementation for the Linux kernel.
If the OS is to be used for an Oracle installation, it is easier if Secure Linux (SELinux) is disabled or switched to permissive. To do this edit the “/etc/selinux/config” file, making sure the SELINUX flag is set as follows.
SELINUX=permissive
If SELinux is configured after installation, the server will need a reboot for the change to take effect.
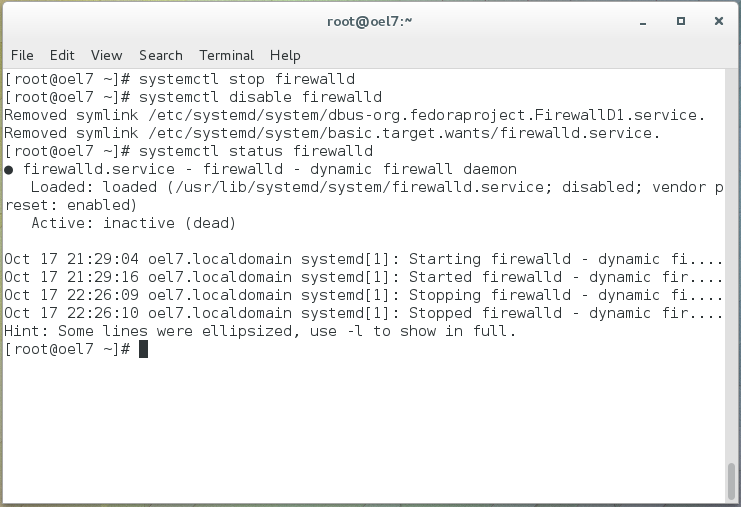
Firewall
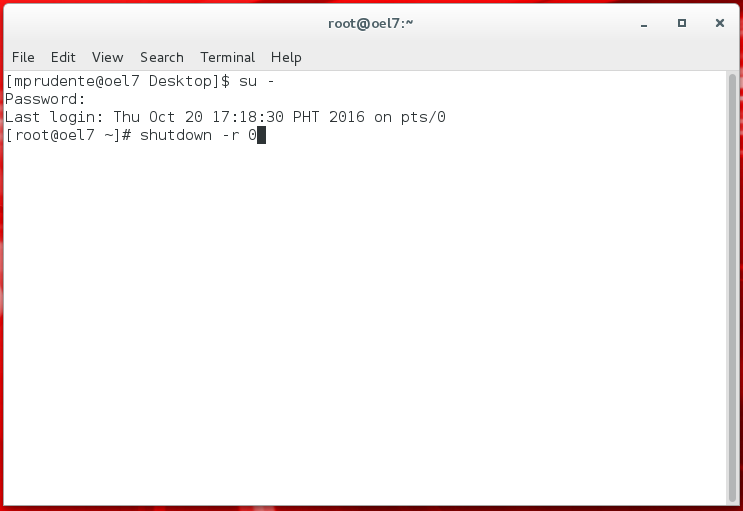
If the OS is to be used for an Oracle installation, it is easier if the firewall is disabled. This can be done by issuing the following commands from a terminal window as the “root” user.
# systemctl stop firewalld
# systemctl disable firewalld
You can install and configure it later if you wish.
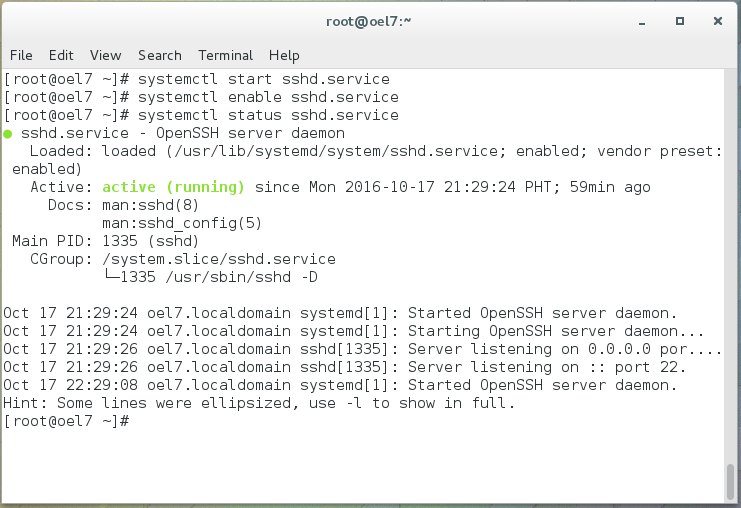
SSH
Make sure the SSH daemon is started using the following commands.
# systemctl start sshd.service
# systemctl enable sshd.service
5. Guest Additions
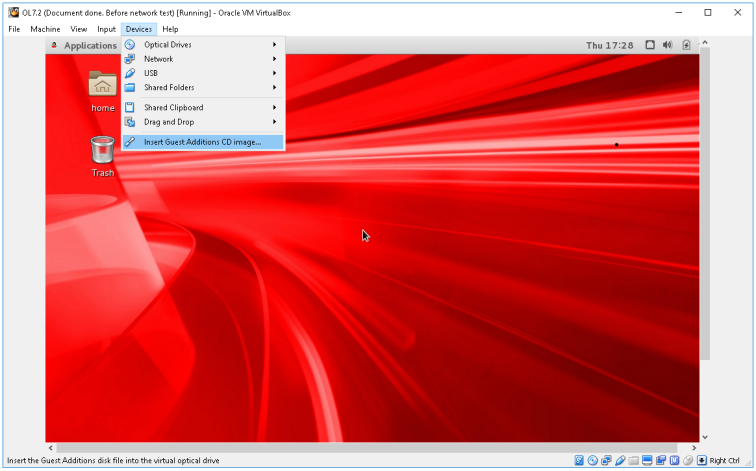
For Shared directory and other important features like working in full screen mode on the VM and not needing to press Right CTRL to switch between Host and Guess OS, you must install the Guest Additions. Select “Devices” menu and click “Insert Guest Additions CD image…”
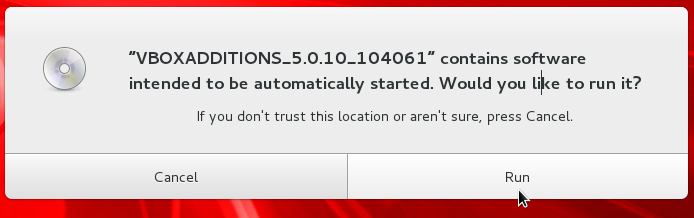
Click “Run” button.
VirtualBox Guest Addition will be installed. Press any key to close the Window.
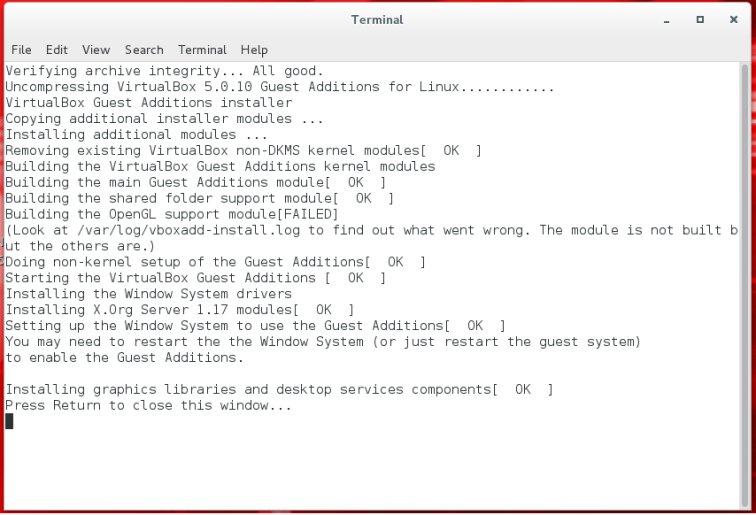
Restart the VM for the changes to take effect.
6. Oracle VM VirtualBox Network
The “Network” section in your virtual machine’s Settings allows you to configure your virtual network cards and how they operate.
By default the “Network Address Translation” (NAT) is used. This way the guest can connect to the outside world using the host’s network and the outside world can connect to services on the guest which you choose to make visible outside of the virtual machine.
On our example, we will test NAT, Bridged and Host-only Adapter network.
NAT
Network Address Translation (NAT) is the simplest way of accessing an external network from a virtual machine. Usually, it does not require any configuration on the host network and guest system. For this reason, it is the default networking mode in VirtualBox.
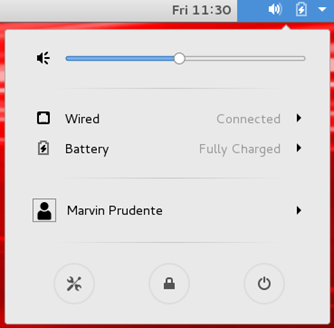
We are using the default network configuration NAT. After the VM restart, click the arrow down icon on the top right bar and click the “Wired” link then click “Wired Settings”.
The Network window will appear, select Wired then click the cog icon at the bottom-right.
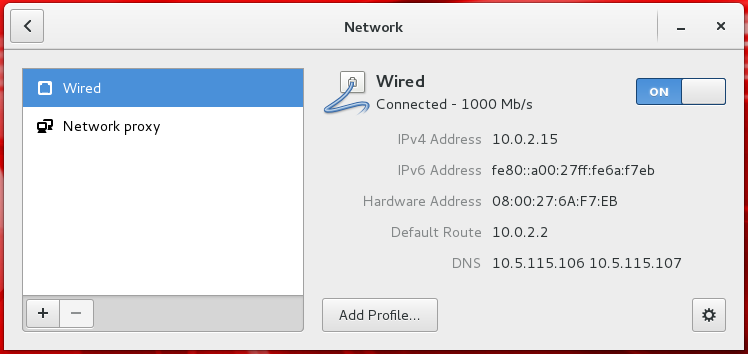
The Wired window will appear, select IPv4 to see the current configuration. No changes are needed for now. Click Cancel button.

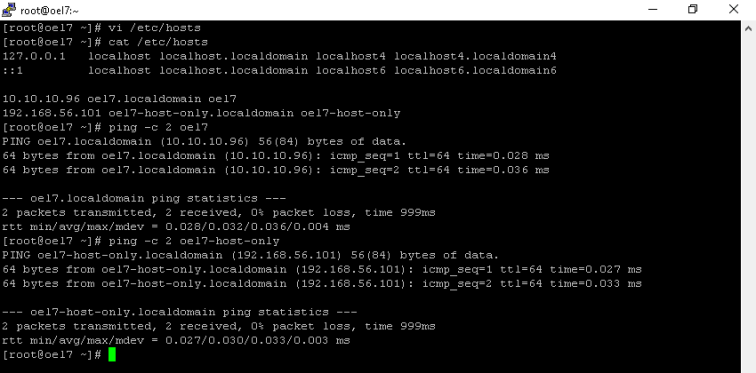
Ping the Host machine. Take note that you wouldn’t be able to ping the Guest OS from the Host machine with this setup. If you want to be able to ping the Guest, you might want to use or add additional network using Host-only or Bridged Adapter.
My Host network configuration:
Address: 10.10.10.96
Netmask: 255.255.252.0
Gateway: 10.10.10.254
DNS: 10.5.115.106
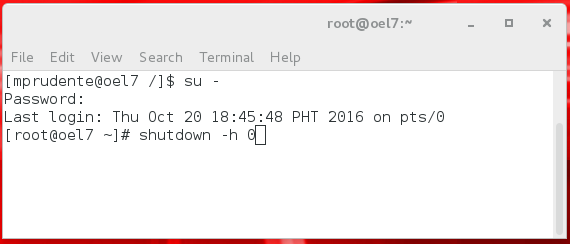
Shutdown your VM so we can change our network to Bridge Adapter.
Bridged Adapter
With Bridged Adapter, your virtual machines behave as any other computer on the network where the hosting system resides. It bridges the virtual and physical networks. The outside world can directly communicate with the guest machine.
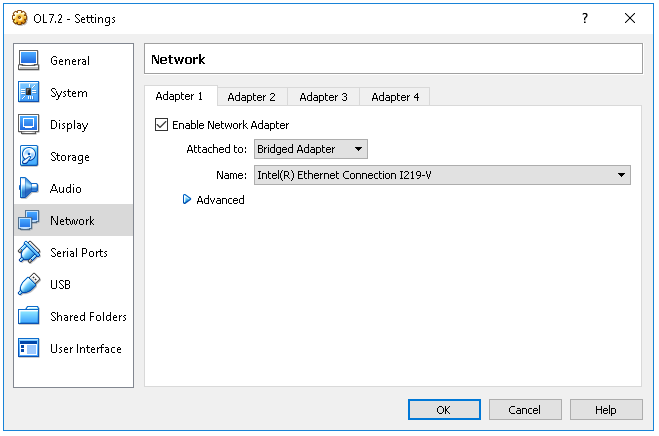
Select your VM then click the “Settings” button on the toolbar.
Click “Network” in the left pane. On “Adapter 1” tab, select “Bridged Adapter” then click “OK” button. Click the “Start” button on the toolbar (Normal Start).
Click the arrow down icon on the top right bar and click the “Wired” link then click “Wired Settings”.
The Network window will appear, select Wired then click the cog icon at the bottom-right.
The Wired window will appear, select IPv4 to modify your IP Address configuration.
Please note that this configuration need to be based on your Host system’s network.
Addresses: Manual
Address: 10.10.10.96
Netmask: 255.255.252.0
Gateway: 10.10.10.254
DNS: 10.5.115.106

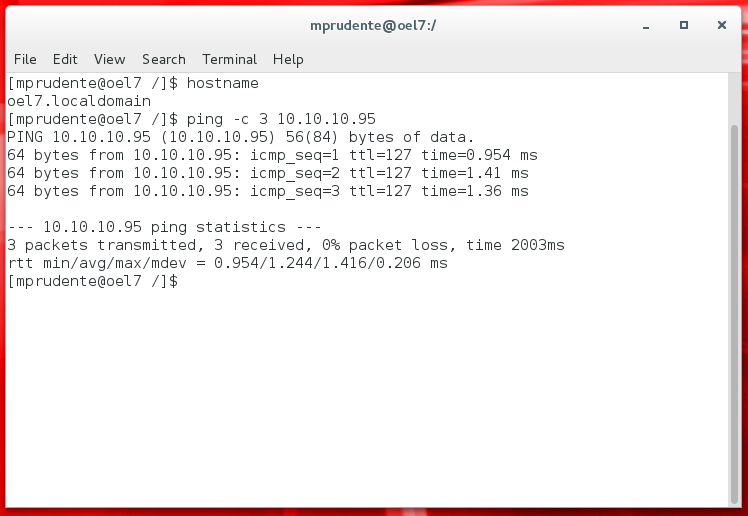
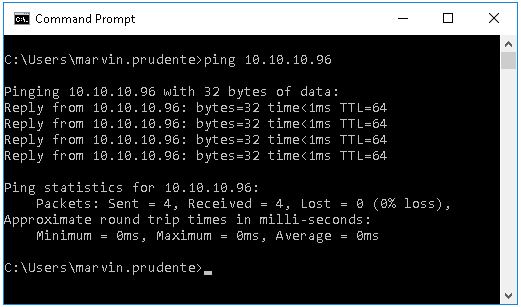
Try to ping your Host’s VirtualBox Host-Only Ethernet Adapter
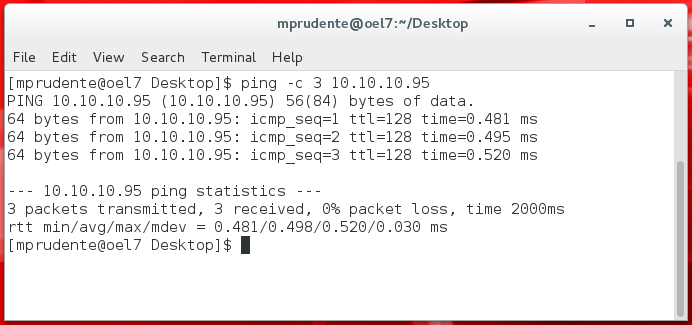
Then try to ping the Guest OS from Host
Shutdown your VM so we can change our network to Host-only Adapter.

Host-only Adapter
By using this type of adapter, you’ll be able to access a private, virtual network consisting solely of your host and any guests. Any of the member machines can access each other, but nothing outside of this self-contained “network in a box” can get in. (Remember the additional configuration we performed on 2. VirtualBox Network Setup step)
Select your VM then click the “Settings” button on the toolbar.
Click “Network” in the left pane. On “Adapter 1” tab, select “Host-only Adapter” then click “OK” button. Click the “Start” button on the toolbar (Normal Start).

Click the arrow down icon on the top right bar and click the “Wired” link then click “Wired Settings”.
The Network window will appear, select Wired then click the cog icon at the bottom-right.
The Wired window will appear, select IPv4 to modify your IP Address configuration.
Please note that this configuration need to be based on your Host system’s network.
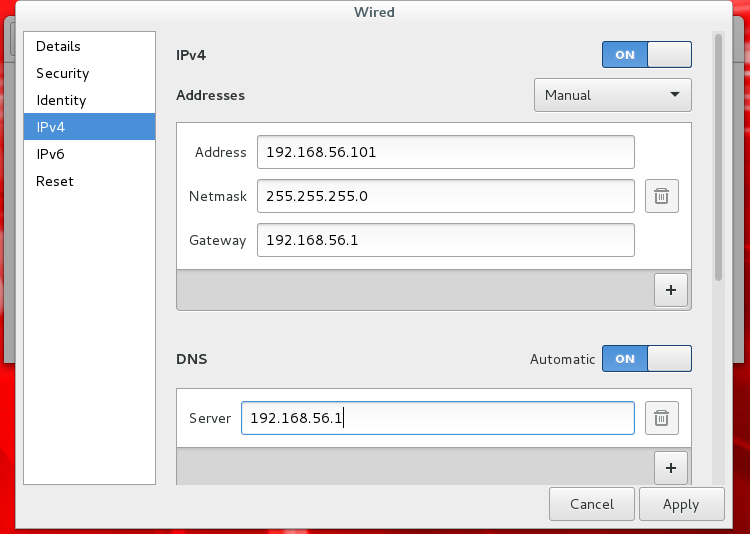
Addresses: Manual
Address: 192.168.56.101
Netmask: 255.255.255.0
Gateway: 192.168.56.1
DNS: 192.168.56.1
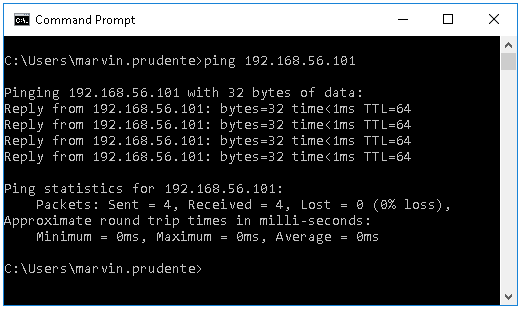
Try to ping your Host’s VirtualBox Host-Only Ethernet Adapter
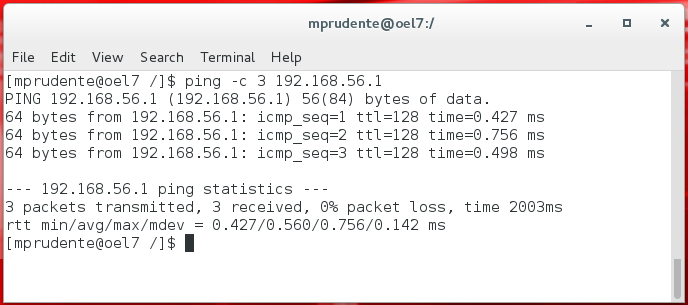
Then try to ping the Guest OS from Host
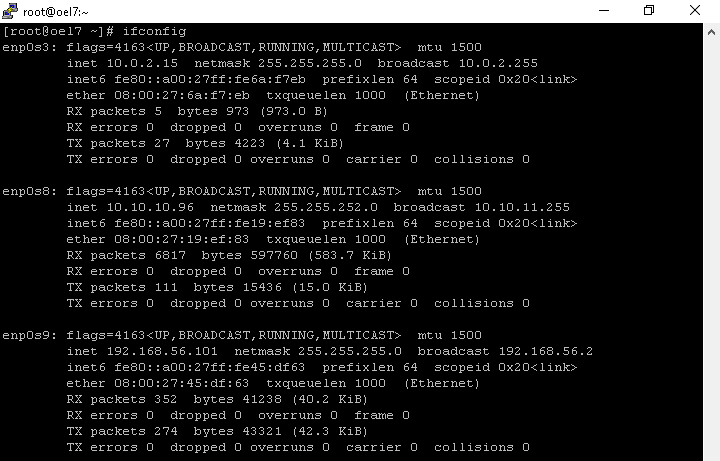
Shutdown your VM. Now try to add 2 more Network Adapters.
Adapter 1: NAT – Automatic (DHCP)
Adapter 2: Bridged Adapter – 10.10.10.95
Adapter 3: Host-only Adapter – 192.168.56.101
Your IP Address configuration should look something like this:
Modify or check your /etc/hosts entry as needed.
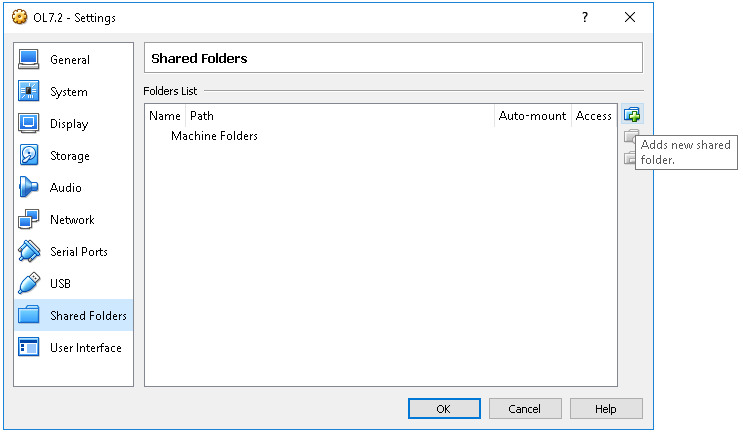
7. Creating Shared Folder for your VirtualBox
In order for your Guest OS to access your files or installers on your Host machine, you will need to create a Shared Folder.
Select your VM then click the “Settings” button on the toolbar.
Click “Shared Folders” in the left pane. Click “Adds new shared folder” icon on the right
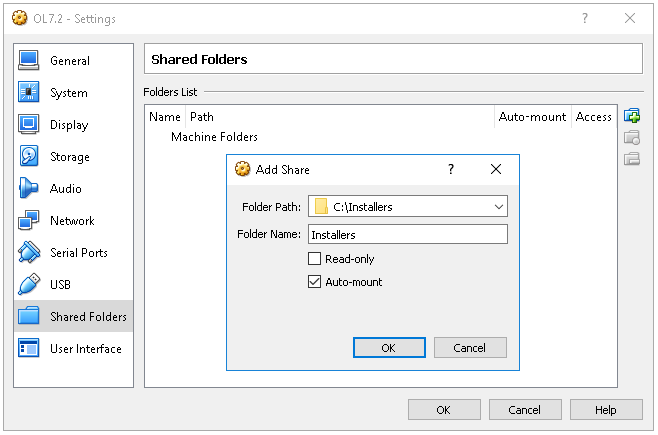
Select the folder path you want to share from your Host machine (in my case, C:\Installers). Check the “Auto-mount” checkbox then click the “OK” button.
You can add new Shared folder or modify the details here. If you’re done, click the “OK” button.
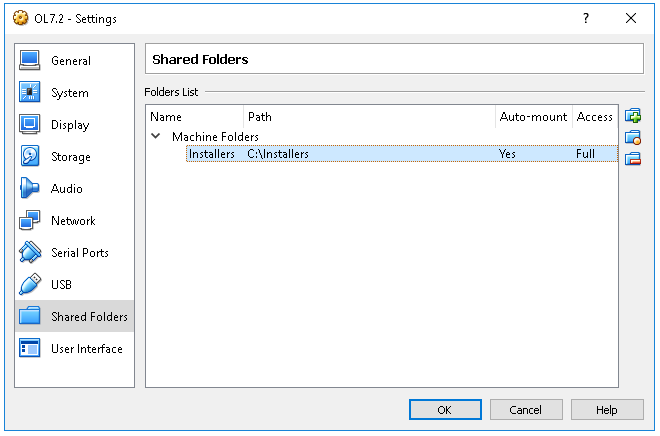
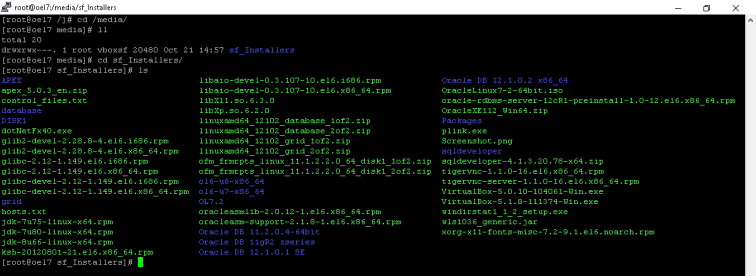
You can find your shared folder on /media (in our case /media/sf_Installers)
Also take note that only group vboxsf have read write execute privilege on this folder so either you change it or use usermod to add the group to your user.
8. Add Disk Storage to Oracle VM VirtualBox
Select your VM then click the “Settings” button on the toolbar.
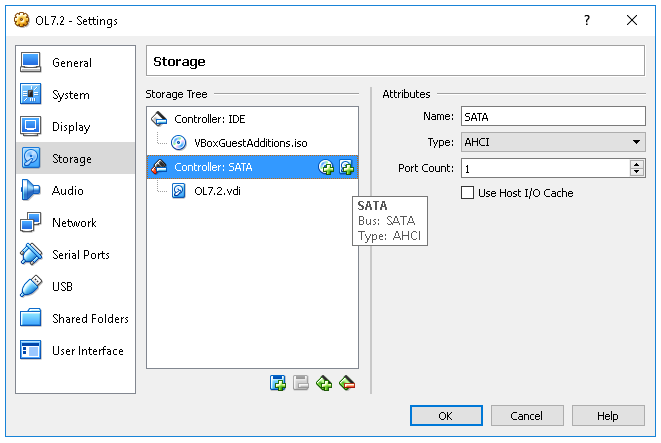
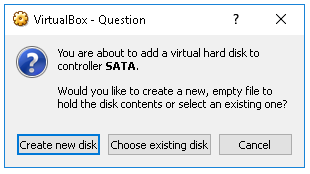
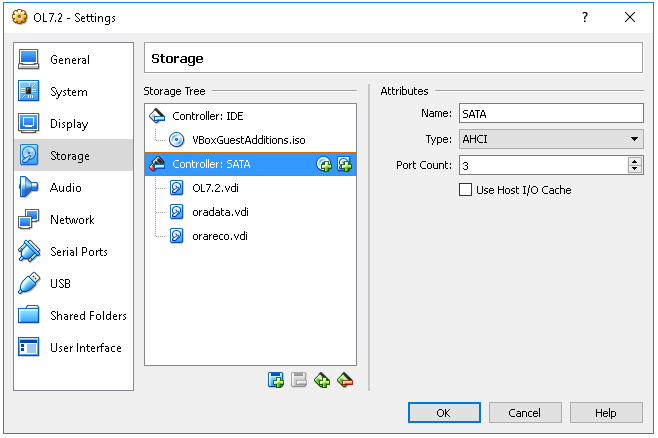
Click “Storage” in the left pane. Click “Adds new Hard Disk” icon on Controller: SATA Storage Tree
Click “Create new disk” button
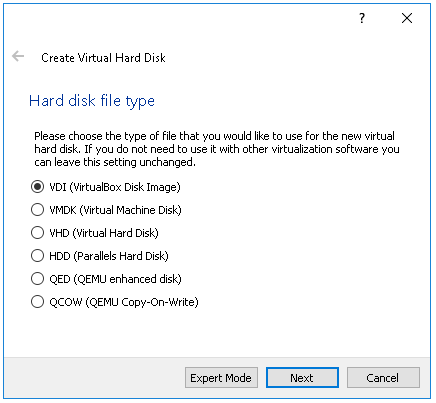
Select VDI hard disk file type then click the “Next” button.
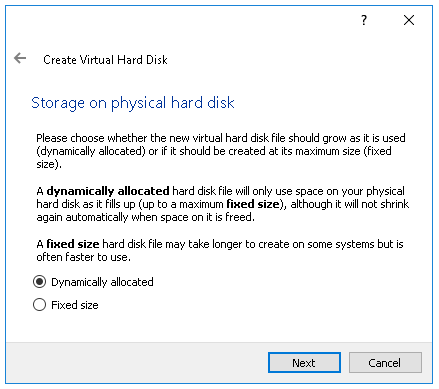
Accept the “Dynamically allocated” option by clicking the “Next” button.
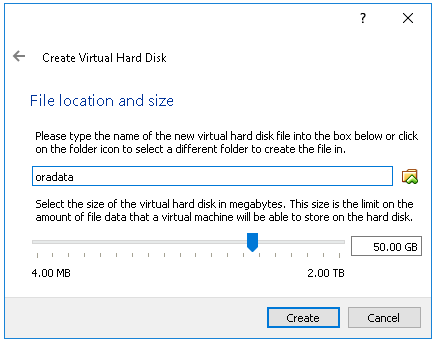
Set the name (in my case “oradata”) and the size to “50.00 GB” then click the “Create” button.
Create another one (in my case, “orareco” with “100.00 GB” size.)
When you’re done, click the “OK” button and start your VM machine.
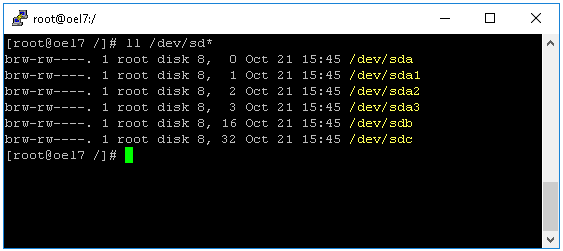
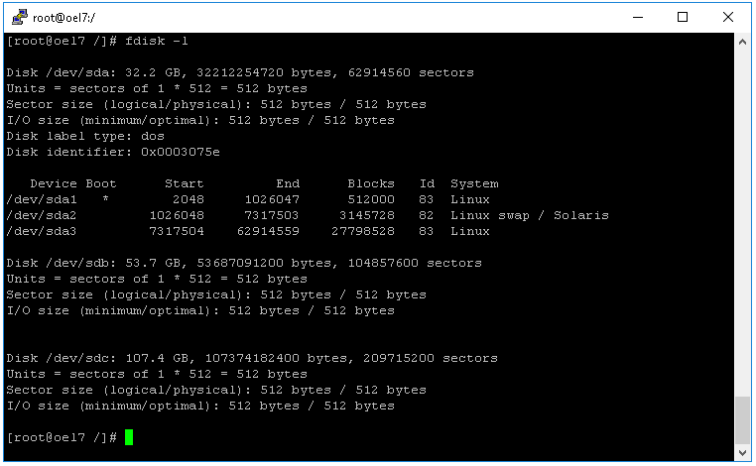
Check the new Hard drives (/dev/sdb and /dev/sdc)
Check your logical disks:
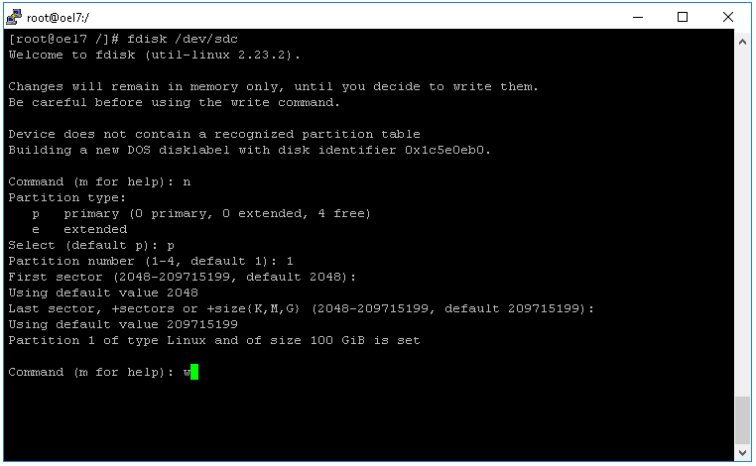
Partition the Device
fdisk /dev/sdb
n
p
1
enter
enter
w

Repeat for /dev/sdc
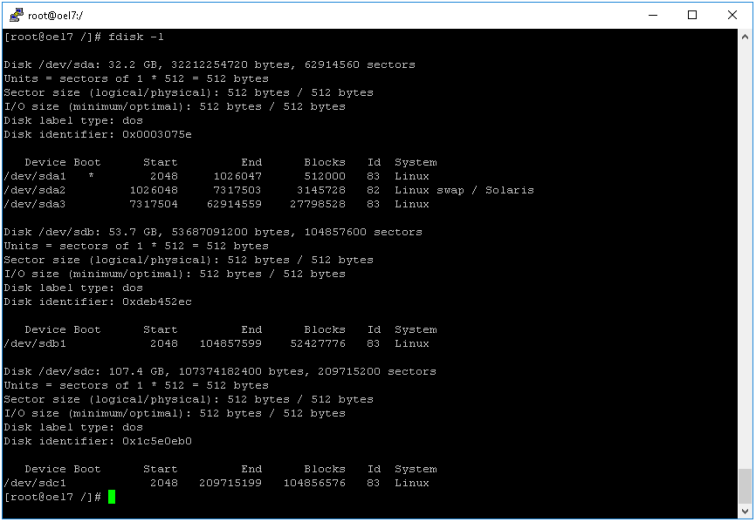
Check the logical disk again to confirm
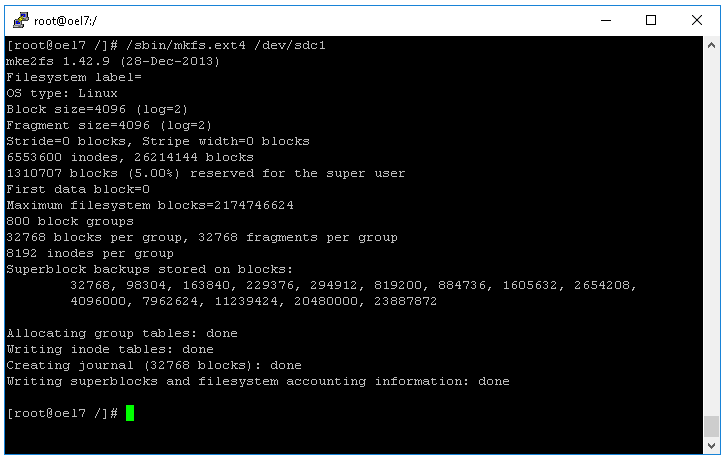
Format the Partition
/sbin/mkfs.ext4 /dev/sdb1

Do the same for /dev/sdc1
Mount the Partition
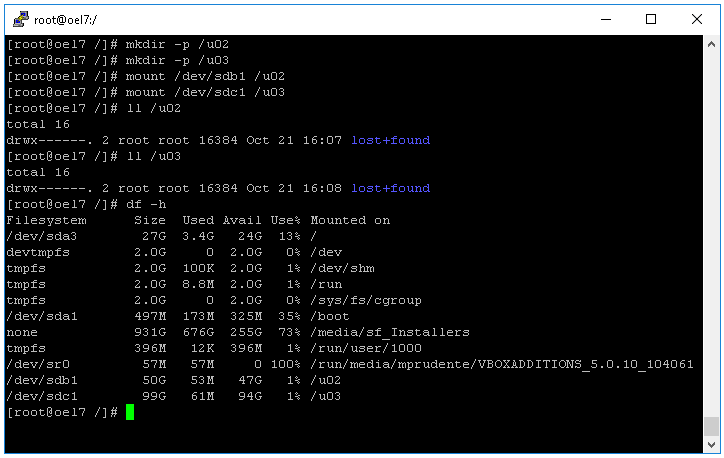
mkdir -p /u02
mkdir -p /u03
mount /dev/sdb1 /u02
mount /dev/sdc1 /u03
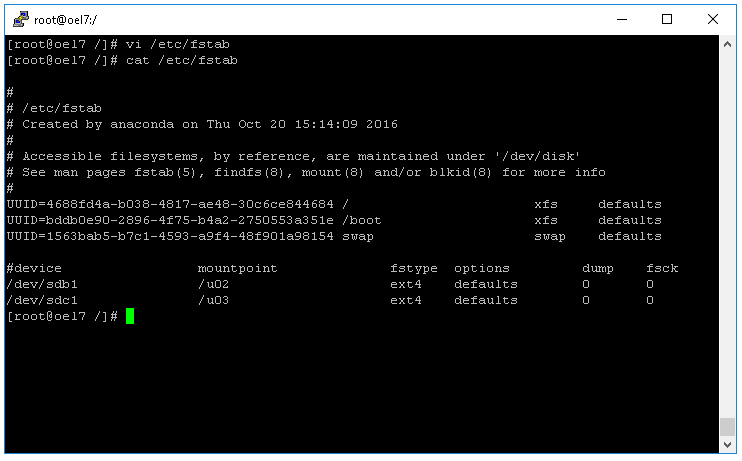
Automate mounting on startup
#device mountpoint fstype options dump fsck
/dev/sdb1 /u02 ext4 defaults 0 0
/dev/sdc1 /u03 ext4 defaults 0 0
Restart your VM and verify all changes. 🙂
